The Add Listing module in Paragon Connect enables you to input a new listing from any device, wherever you are. Enjoy the same tools and capabilities you have on Paragon desktop, such as Tax Autofill and copying listings, photos, documents, contacts, and more.
Key Features
- Full listing form with all fields and features
- Ability to look up fields
- Save your progress and finish later
- Upload documents
- Price analysis tool for determining optimal listing price
- Address location validation
- Add, edit, or delete upcoming tours or open houses
Add Listing
- From the Paragon Connect Home page, click the Menu in the upper left corner and select Listings.

Note: To view or edit Published and Unpublished (or Partial) Listings, click on the appropriate icon. Click here for more information on editing listings in Paragon Connect.
- Click + to add a new listing

- Click Tax Autofill to import the tax data into your new listing, or Manual to add the information yourself. For this example, we have selected Tax Autofill.

- In “Required Criteria,” enter the County.
- In the “Additional” section, enter the property’s APN (Assessor Parcel Number) or Tax Id, or its Street Number and Street Name, then click Search.

Note: When searching for tax data by a property’s Street Number and Street Name, do not include a street direction (North, South, East, or West) or suffix (Ave., Blvd., etc.). For example, if the property is located at 225 Main St., enter “225” and “Main” in the respective search fields.
- Confirm the results are correct, then click Autofill.
- Select the property type, then click Create. For this example, we have selected “Residential.”

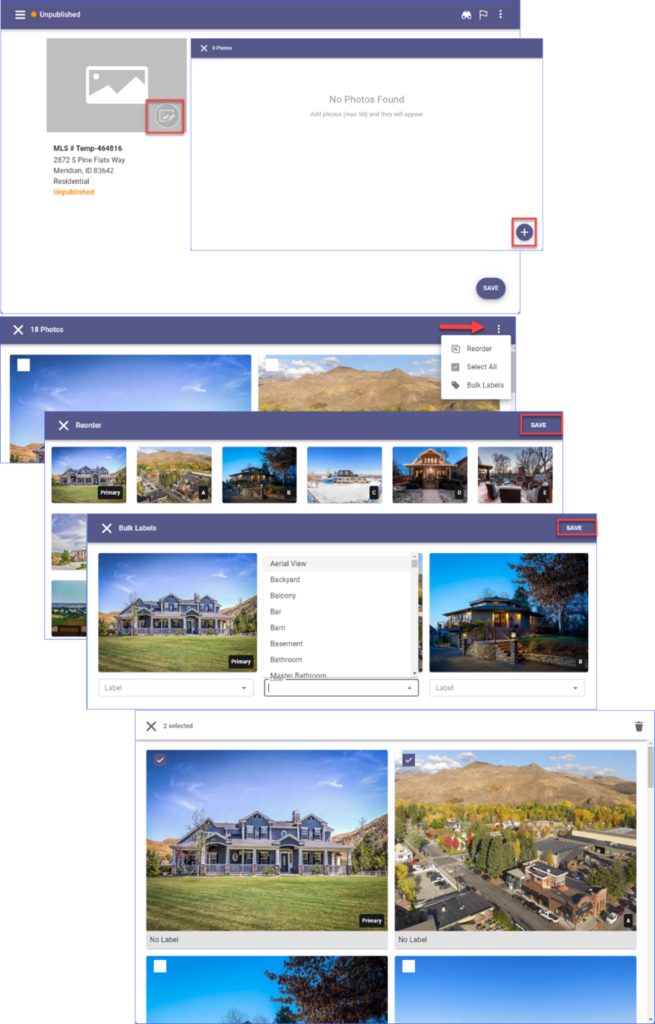
- Click the photo icon and then click the + to add up to 50 photos.
- Click on the 3-dot menu to Reorder, Select All, and/or apply Bulk Labels.
- To delete photos, check the box at the top left of each one you want to get rid of and click the trash can icon.
- You can select several photos and then click the 3-dot menu to Add Labels to the selected photos, edit them with Image Editor, or Replace Photo.
- Click Save before proceeding to the next option.

- Enter information for your listing in each section. Required fields are indicated with an asterisk and outlined in red.

Tools in the upper right corner include:
- Binoculars: Find/search in the listing input form
- Flag: Only show required fields
- 3-dot menu: Price Analysis, add/edit Documents, and Edit Photos

- Select your status type – New or Back On Market or Coming Soon. For Coming Soon, the Status Disclosure Form is required to be uploaded.
Note: Coming Soon listings automatically change to NEW after 14 days and are not syndicated to the internet sites.

- Continue entering all required and applicable fields and showing information, upload additional photos and any documents, and click Save.
Select either:
- Publish: Your listing will be live on the MLS
- Save Unpublished: Save as a partial or incomplete listing and finish later.

Note: If any required fields are missing information, or if the listing contains warnings or errors, a red exclamation point warning symbol and/or amber caution symbol will appear in the top right corner. Click on the symbols to jump to each field and update. Click the left or right “< >” arrows to go to the next field that needs attention. All errors must be corrected before the listing can be published. If you are unsure whether you’ve completed all required fields, click Save and Publish again.

- When the listing is saved, Published listings will automatically be assigned a Multiple Listing Number. Unpublished listings will be assigned a temporary number.

- When the listing is Published, you can click on the 3-dot menu to Add Photos, add an Open House or Documents, and more.

